Black Header_CC
Logos of Zurich, Cast and Crew, CAPS, Media Services, The Team Companies

Loss Prevention Forms and Resources

Cast & Crew’s Loss Prevention program will help your production protect itself against mistakes and mishaps. In the gallery below, you’ll find all the forms and resources related to our program and Loss Prevention services. 


Safety Documents

Best Practices In Dealing With Wild Animals On Set:

  • Only qualified professional trainers or handlers should be allowed to work with animals on productions.
  • The trainer or person supplying the animals shall be responsible for obtaining all necessary inoculations, permits, licenses and medical safeguards.
  • Notice shall be included on the call sheet that animals are working, and a closed set should be maintained if at all possible, and notices should be posted on all areas where animals are working.
  • An easily accessible area should be designated for loading and unloading of animals.
  • The trainer has the responsibility to convey specific safety concerns related to the animals being used, to include; addressing affected personnel (including guardians of minors) regarding safety precautions, required distances from wild/exotic animals, no personal pets, no feeding/running, etc.
  • A veterinarian should be on set if animals are subject to potentially dangerous or complicated actions, and consideration should be given to having tranquilizing equipment available.
  • There should be two handlers for undomesticated animals such as a large cat or carnivore.
  • When venomous reptiles are present, the proper antidote (anti-venom) should be readily available and communicated on the call sheet.
  • The American Humane Association shall be notified prior to commencement of work on set with any animals and may be on set during filming. Script scenes shall be made available.

Venomous Animals

Special and additional precautions should be taken if venomous reptiles are being filmed.

Dangers

  • Bites, scratch, claw.
  • Introduce allergans.
  • Bacteria spread, i.e. salmonella, special concern if pregnant, elderly, children.
  • Proper temperature, humidity, lighting for reptile health.
  • Incompatilbe reptiles on same set.
  • Escape.

Preparations

  • Notify nearby medical facility one day prior.
  • Assure proper antidote (antivenom) is available.
  • Essential personnel only within 50' of reptile AHA pre-notification.
  • Snake handler must have Prohibited Species Permit.
  • Proper personal protective equipment shall be used by affected cast and crew.
  • A stand-by vehicle and driver for emergencies.
  • Snake should be milked of venom on same day.
  • Snake pincer on hand.

Preparations

  • Always wash hands with warm, soapy water, if touching reptile, enclosure, food or faeces.
  • Do not eat, drink or smoke while working with or around reptiles.
  • Wash any clothes in contact with reptiles or enviornment.
  • If bitten, scratched or clawed - stay calm, as any venom spreads faster as heart pumps faster.
  • Seek professional medical attention immediately - don't wait for symptoms to appear.
  • Wash bite with soap and water. Don't ice or submerge in water. Don't apply a tourniquet.
  • Symptoms: redness and swelling, nausea, diculty breathing, numb limbs, blurred vision, sweating.


Additional resources: 

American Humane Association – Guidelines for Producers/Filmmakers
Federal Animal Welfare Act (AWA)

Bloodborne pathogens are infectious microorganisms present in blood that can cause disease in humans. These pathogens include, but are not limited to, hepatitis B virus (HBV), hepatitis C virus (HCV), and human immunodeficiency virus (HIV), the virus that causes AIDS. Workers exposed to bloodborne pathogens are at risk for serious or life-threatening illnesses.

Issues

  • Bloodborne Pathogens can occur in any industry and from contact with any bodily fluid, not just blood.
  • Direct contact occurs when infected blood or body fluids from one person enter another person’s body through open, broken areas of skin or mucous membranes. Indirect contact occurs when a person touches an object that contains the blood or body fluid of an infected person, and that infected blood or body fluid enters the body.
  • All blood and other potentially infectious material (OPIM) must be treated as if it is contaminated.
  • Bloodborne Pathogen exposures can occur during routine first aid procedures.
  • Contaminated needles, broken glass, and other sharp objects may be contaminated with bloodborne pathogens.
  • There are people trained to respond to potential bloodborne pathogens incidents on your production site. Questions about potentially infectious items and/or situations should be reported to your Supervisor.

Prevention

  • Wear appropriate gloves when it can be reasonably anticipated that you may have contact with blood or other potentially infectious materials and when handling or touching contaminated materials.
  • Wash hands immediately or as soon as feasible after removal of gloves or other personal protective equipment. If hand washing is not immediately available, hand sanitizer may be used until the employee is able to wash his/her hands with soap and water.
  • Remove protective equipment before leaving the work area and after a garment becomes contaminated.
  • Following any contact of body areas with blood or any other infectious materials, you must wash your hands and any other exposed skin with soap and water as soon as possible. Employees must also flush exposed mucous membranes (eyes, mouth, etc.,) with water.
  • Never wash or decontaminate disposable gloves for reuse or before disposal. They may not be decontaminated for reuse.
  • Use CPR breathing barriers, such as resuscitation masks, when giving ventilations (rescue breaths).

Daily equipment and wall inspection

This inspection should be completed twice during a business day and once after each shift. Again, remember that we must always be on the lookout for problems.

Check all top-ropes for signs of excessive wear and abrasion. Check all lead ropes for signs of excessive wear and abrasion. Make sure that all bolts on the wall have quick draws and that they are in good condition. Check for abrasion on the webbing and grooves in the carabiners. Maintain this information in Rope and Maintenance Logs.

Safety & lead test protocol

All climbers who do not present a Safety Card when checking in must pass the safety test before climbing at the facility. The climber must demonstrate the ability to properly put on and tie in to their harness. The climber must also show proper belaying skills. These skills must be demonstrated without coaching by other climbers. Any climber who wants to “lead climb” must first pass the Lead Test. Anyone who does not have a Safety Card should not be allowed to use the facility.

Equipment and Hardware inspection

Ropes

Rope sheathing is not load bearing, but protects the rope core.
Inspect ropes daily, maintain a written inspection log. The most important things to check for with top ropes are sheath slippage and sheath abrasion. Retire any ropes with slippage greater than five inches.
Abrasion should also be checked for. Look at the rope over its entire length. If there are sections that look “fuzzy”, Retire the rope.

Harnesses

All climbers must have a UIAA approved harness, belay device and locking carabiner. Check for excessive abrasion in the webbing, buckle, and tie-in points during periodic checks. Retire a harness if it displays signs of excessive wear in these areas, or after three years.

Bolts

Bolts fasten holds to the t-nut in the climbing wall, and are organized by type. Retire bolts with stripped threads, they will damage the t-nuts and make it difficult to properly torque holds.

Holds

BROKEN HOLDS
Most often due to over-tightening, climbing holds will break. It is recommended that these holds be returned to the
manufacturer for replacement. Often, broken holds will be replaced free of charge as per their warranty. It also helps the hold company improve and strengthen their mix.

SPINNING HOLDS
Rough up the back of the hold and re-tighten. As a second option, place a small foothold very close to prevent it from spinning, like a doorstop.

CUT HOLDS HARDWARE INSPECTION
Sometimes the friction of a rope rubbing against a hold will cut the hold. This can create a sharp edge that may damage rope or a climber. Retire a hold that has a cut.

Essential safety tips

  • Always have a spotter when bouldering.
  • Allow right of way to other climbers who were first on route on any given section of wall (this includes bouldering).
  • Always stand clear of climbers’ fall and swing zones.
  • Keep walkways, doorways and exits clear of traffic.
  • Provide lockers or storage cubicles to store belongings away from climbing areas.
  • Stay clear of all climbing areas when not climbing, belaying or spotting - other climbers may fall unexpectedly from above.


Route setting: ABC

Route setting is a valuable product a gym offers. Creating a fun, challenging, and safe atmosphere is a skill that can be augmented by following this doctrine to keep climbers safe. 


Choose safe routes

Keep climbers away from stairs, ladders, equipment, mechanical & plumbing protuberances, as well as wall features like arêtes. Minimize swinging falls, and eliminate them if adjacent routes could be affected.


Select comfortable clips

The second clip: greatest potential of a severe fall. This is where a climber could contact the ground from the greatest height in the event of a fall. The final clip: include a solid jug for ease of clipping the final anchor. Clips should not be the crux - the hardest parts of an indoor route should be the moves in between clips.


Hold selection

Vertical, slab & slight-overhang walls: limit or eliminate use of large, protruding holds. These have great potential to cause injury to knees, elbows, ribs, ankles and heads. Watch for wear spots on holds that create a sharp edge.


Route setting with a ladder

Ensure that ladder users are well versed in ladder safety and use. Basic ladder information can be found at:
https://www.osha.gov/publications/bytopic/ladder-safety

Setters working on a ladder will wear a harness with two slings & locking carabiners on the front. At heights over 6 feet the setter will clip into an anchor, affording use of both hands as well as fall protection should the ladder fall.
When working with a ladder and a top-rope, ladder setters may self-belay on the ladder. Tie an over- hand knot on the brake hand side to prevent the rope from feeding through in the event of a fall. Have someone on the ground hoist holds, bolts and tools up to the setter with a bucket on a rope. Nothing should be tossed up or dropped from height. Fully collapse extension ladders before moving them.


Route setting on top-rope

Use a self-locking belay device, such as a Gri-Gri. At height, tie an overhand knot on a bight below the belay device to prevent rope from feeding through in case it releases unexpectedly. Designate someone on the ground to hoist holds, hardware and tools in a bucket.

Ten safe practices for outdoor climbing

1. WEAR A HELMET

Climber: Provides protection against swinging falls or lead falls, and falling rock. An unconscious climber cannot help themselves.

Belayer: Loose rock and debris striking an unprotected belayer can spell disaster for the climber.

2. DOUBLE CHECK BELAY AND KNOTS

Are you tied in correctly? Check your knot. Check for good tail length. Check for correct placement on your harness.

Rope threaded through your belay Device? Carabiners Locked? Check your partner.

3. COMMUNICATION

Before ascending, agree on a plan with your partner for communication en-route, and what you’ll do when you get to the anchor. Ensure that you’re in a position to convey intent to your partner if necessary - take into consideration factors such as ambient noise and line of sight.

4. CARABINER VS EDGE

When placing quickdraws, note where the carabiner could end up under load - if it’s hanging over an edge in a fall, it could break because it is not designed for this type of loading.

5. CHECK YOUR EQUIPMENT - AND FIXED EQUIPMENT

Check ropes for signs of excessive wear and abrasion. Check for abrasion on webbing and grooves or deformities in carabiners. If these conditions exist, remove the equipment from service. Check bolts on the route you are climbing for corrosion and fractures. If you find anchors that show excessive wear, find a safe way down.

6. Z-CLIPPING & BACK CLIPPING

Z-Clipping: When a climber grabs rope from below the last clipped bolt, then clips it to a higher bolt, forming a ‘Z’ shape with the rope. This will create so much rope drag that climbing up will be impossible. Avoid by reaching for the rope close to your harness, at the tie-in knot.

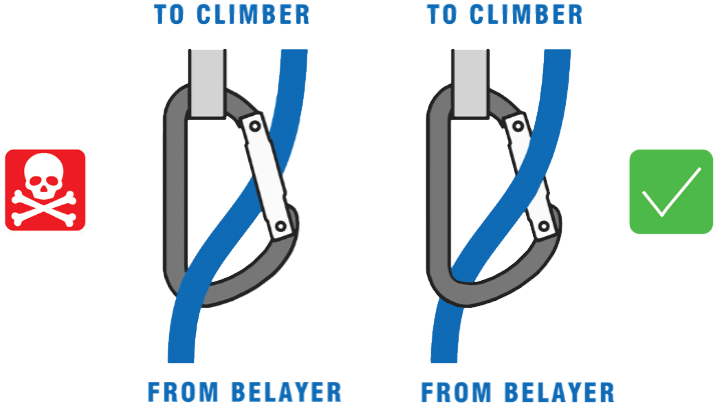
Back-clipping: While lead climbing, clip in to your quickdraw so that the climber’s end of the rope faces away from the rock. During a fall, rope can tangle the carabiner gate of a back-clipped quickdraw, causing it to open, which leaves the climber unprotected.

7. SETTING UP TOP-ROPE ON A FIXED ANCHOR

Top-rope through your own quickdraws attached to fixed anchors. Repeated rope contact on fixed anchors will wear them down over time to the point where the hardware is ruined. When you’re finished on the route, lower once or rappel through fixed anchors.

8. KNOT THE END OF YOUR ROPE

When belaying on a single-pitch route, tie a knot in the end, tie the end to the rope bag, or yourself. Being lowered off the end of a rope on a sport climbing route is a common incident. Slipping off the end of a rappel is also common, even among the most experienced climbers in the world.

9. RAPPELLING

Rappelling accidents are most frequently associated with detaching from the rappel rope and anchor failure. Follow this guidance for rappelling:

  • Tie stopper knots well before the end of the rope
  • Check that both ropes are secure in your belay device
  • Feed rope through locking carabiners or a rapid link, not slings
  • Use a backup like a Prusik in case of a loss of control
10. ENVIRONMENTAL DANGERS

Environmental dangers are often fatal to climbers. Plan and prepare for the risks associated with lightning, heat, cold, and wet conditions. Even if afflictions such as heat illnesses or hypothermia don’t prove deadly in and of themselves, they can cloud a climber’s judgment, leading us to make decisions that have deadly consequences.

outdoor_climbing


Protecting Yourself From Cold Stress

  • Protect the ears, face, hands and feet in extremely cold or wet weather.
    • Wear several layers of loose clothing for insulation.
    • Wear a hat and gloves to reduce the loss of body heat, in addition to underwear that will keep water away from the skin (polypropylene).
    • Boots should be waterproof and insulated.
  • Move into warm locations during breaks; limit the amount of time outside.
  • Avoid exhaustion or fatigue. Energy is needed to keep muscles warm.
  • Use the buddy system (work in pairs and monitor your physical condition and your coweorker's).
  • Carry extra socks, gloves, hats, jacket, blankets, a change of clothes and a thermos of hot liquid.
  • Include chemical hot packs in your first aid kit. • Avoid touching cold metal surfaces with bare skin.
  • Drink warm, sweet beverages (sugar water, sports-type drinks). Avoid drinks with caffeine (coffee, tea, or hot chocolate) or alcohol.


Hypothermia

A condition in which the body uses up its stored energy and can no longer produce heat. Often occurs after prolonged exposure to cold temperature.

Early Symptoms

  • Shivering.
  • Fatigue.
  • Loss of coordination.
  • Confusion and disorientation.
  • Slurred speech.
  • Confused behavior.

Late Symptoms

  • No shivering.
  • Cool, bluish skin.
  • Dilated pupils.
  • Slowed pulse and breathing.
  • Loss of consciousness.

First Aid - Dial 911 if exhibiting Late Symptoms

  • Request immediate medical assistance. Dial 911.
  • Move the victim into a warm room or shelter - don't leave the person alone.
  • Remove wet clothing.
  • Warm the center of their body first - chest, neck, head, and groin - using an electric blanket; or use skin-to-skin contact under loose, dry layers of blankets, clothing, or towels.
  • If conscious, warm, sweet drinks can help increase the body temperature; no caffeine or alcohol.
  • Once temperature has increased, keep them dry and wrapped in a warm blanket, including the head and neck.
  • DO NOT rub the person's body or place them in warm water baths.

Following Too Closely

Judging and managing the space between your vehicle and the one in front of you is a critical part of driving safely. According to NHTSA, rear-end collisions account for approximately 1.7 million collisions which amounts to about 1,700 fatalities and 500,000 injured. of all crashes on an annual basis.

Issue

Following too closely is often referred to as “Tailgating”. Tailgating is a form of aggressive driving when impatience leads to driving too closely to the lead vehicle. The odds of a crash go up when tailgating behavior is combined with other factors like:

  • being distracted,
  • feeling ill or tired, or
  • traveling faster than conditions allow

You need more space when….

  • Weather Conditions (snow, ice, rain, etc.)
  • You are following large vehicles that block your view ahead.
  • You need the extra room to see around the vehicle and to the sides.
  • You are traveling at higher speeds.
  • You are tired or distracted (recognition and reaction times will be longer).

Prevention

  • Look farther up the road to spot traffic stopping not just the car in front of you.
  • Check your mirrors every 5 to 8 seconds and again when slowing or stopping.
  • Stay focused and scan all around for vehicles that could hit your vehicle. Look beyond your lane.
  • As you slow to a stop, identify an escape route and leave vehicle 4-5 car lengths in front of you.
  • Never rush up to a stop. Always slow gradually forcing the vehicle behind to also slow gradually.
  • Avoid sudden lane changes. Use directional and check mirror and blind spot before changing.
  • While stopped, visualize what you can do should the vehicle behind you not show signs of stopping in time. Be prepared to accelerate and steer to where you want to go.
  • Keep your foot on the brake while you are stopped to keep brake lights on.
  • While driving leave more space between you and the vehicle in front. Following too closely reduces your stopping time.
  • If drivers follow too closely, do not brake hard to scare them off. Simply slow gradually at the next available passing zone or pull into safe location and let them go by.

Distracted Driving

In today’s busy world, distractions are everywhere. Our phones and other electronics allow us to be in constant contact with work and family, but they also present potential dangers. Mobile devices are the leading cause of distraction behind the wheel . Each year crash and injury statistics rise in number and severity. Don’t be a statistic.

Issue

Each day in the United States, approximately 9 people are killed and more than 1,000 injured in crashes that are reported to involve a distracted driver.

Distracted driving is driving while doing another activity that takes your attention away from driving. Distracted driving can increase the chance of a motor vehicle crash.

There are 3 main types of Distraction:

  • Visual: taking your eyes off the road.
  • Manual: taking your hands off the wheel
  • Cognitive: taking your mind off of driving

Sending a text message, talking on a cell phone, using a navigation system, and eating while driving are a few examples of distracted driving.

Texting while driving is especially dangerous because it combines all three types of distraction. When you send or read a text message, you take your eyes off the road for about 5 seconds, long enough to cover the length a football field while driving at 55 mph.

Prevention

  • If you cannot devote your full attention to driving because of some other activity, it’s a distraction. Take care of it before or after your trip, not while behind the wheel.
  • Fully focus on driving. Do not let anything divert your attention, actively scan the road and watch out for pedestrians and cyclists.
  • Put aside your electronic distractions. Don’t use cell phones while driving (handheld or hands-free) except in absolute emergencies. Never use text messaging, email functions, video games or the internet with a wireless device, including those built into the vehicle, while driving.
  • Store loose gear, possessions and other distractions that could roll around in the car, so you do not feel tempted to reach for them on the floor or the seat.
  • If another activity demands your attention, instead of trying to attempt it while driving, pull off the road and stop your vehicle in a safe place.
  • If possible, eat meals or snacks before or after your trip, not while driving. On the road, avoid messy foods that can be difficult to manage.

Driving Safety

Electrical current is unforgiving
Electrocutions happen in less than a second. More than 2/3 of those killed by electricity are not electricians.

Overhead power lines are the primary killers
 You can be killed instantly if you are carrying a metal ladder or metal equipment and you touch a power line.

Even household current can kill you

Before beginning work…

1. Inspect equipment and cords for damage

Remove and tag as "Do Not Use" anything that has exposed wiring, a missing ground prong, a cracked tool casing, or a frayed, taped, or spliced cord. Use double-insulated tools marked with the symbol at left.

2. Ask if GFCIs, tools and cords are tested

GFCIs (ground fault circuit interrupters) save lives on sites. OSHA requires GFCIs on all temporary wiring. (You should hit the “test” and “reset” buttons on GFCIs to make sure they are working.) A competent person should test tools and equipment to make sure they are safe.

3. Check with your supervisor

Check to see if there are any live electrical circuits where you can contact them – overhead or underground power lines or circuits in walls where you might drill. If there are, assure that you and your co-workers know where the hazards are and how to work.

Once you are working…

Speak up if you’re not sure.

OSHA says electrical systems must be grounded. All electric systems, including wiring and switches, must be checked prior to use to be sure the path to ground is continuous.

If you are not sure, ask the supervisor on the job.

OSHA warns that the following equipment poses risk around lines:

  • Aluminum extension poll for paint rollers.
  • Backhoes and cranes.
  • Concrete pumpers.
  • Long-handled cement finishing floats.
  • Metal ladders.
  • Raised dump truck beds.
  • Scaffolding.

Electrical hazards are also at eye level and undergound:

  • Power tools with bad wiring.
  • Buried electrical lines.
  • Bad insulation on wiring.
  • Cords missing grounding prongs.
  • Cords damaged by wear.

Asking a question can save a life – possibly yours.

Steer clear of water and metal

In wet or damp areas, use only tools or equipment designed and labeled for that use. Use fiberglass or wooden ladders and keep metal ladders away from live electric current. Any tool, regardless of the material can be deadly when wet.


If you think you are in danger: Contact your supervisor.

Fall Protection deficiencies are the most commonly cited standards and fall related incidents consistently result in the most serious injuries, potentially even death, according to OSHA.gov. The Bureau of Labor Statistics identified falls to a lower level as the cause of nearly 30% of all fatal occupational accidents, excluding transportation related incidents.

There is an inherent need for work at heights with employee understanding of this severe risk potential critically important. There should be a focused and specific emphasis on recognition, planning and controlling work at height risks, ensuring that all activities (including non-production, one off activities) are included in the awareness and education efforts.


Engineering Controls

  • Re-locate tasks to ground level.
  • Minimize distances of fall.
  • Use of fixed guardrails.
  • Use of Security Gates at elevated walking working surfaces.

Administrative Controls

  • Inspection of work areas for weak areas, holes or floor openings.
  • Restriction of access/use of signs.
  • Fall awareness training.
  • Establish Best Practices e.g. never reach outside the protected area.
  • Consider rescue procedures.

Personal Protective Equipment

  • Personal fall arrest systems.
  • Positioning systems.
  • Travel restraint systems.
  • Safety net systems.


Safety

Fall Protection - Personal fall arrest

Personal Fall Arrest

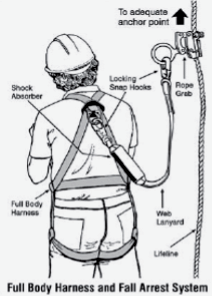
A system of components used to arrest (catch) an employee in a fall from a working level.

Fall Protection - Positioning system

Positioning System

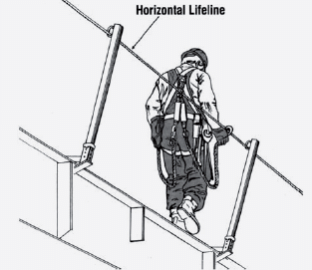
A body belt or body harness rigged to allow an employee to be supported on an elevated vertical surface, such as a wall, and work with both hands free while leaning.

Fall Protection - Travel restraint

Travel Restraint

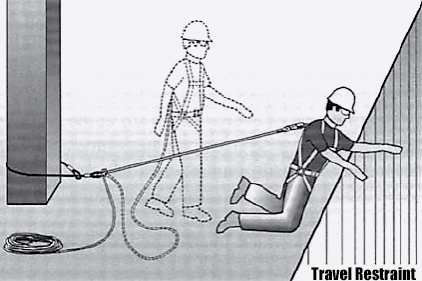
A travel-restraint system lets a worker travel just far enough to reach the edge but not far enough to fall over. Typically Involves a harness, lifeline, grab rope and anchor point.


Equipment Failure

  • Not aligning rebar snap hooks directly overhead
  • Use of damaged or recalled equipment (equipment failure)
  • Insufficient anchor strength


Equipment Misuse

  • Anchor point is below the Dorsal D-Ring (Increasing fall distance)
  • Inappropriate anchor connections e.g. wrapping lanyard through itself used as an anchor point
  • Improper fit of equipment (head injury if Dorsal D-ring is too high)


Additional resources:

Fall Protection
HSE UK – Fall Protection
IHSA.CA – Fall Protection
OSHA General Industry – Fall Protection
Cal OSHA –Construction Safety Orders

Employee fatigue affects both safety and productivity at work. Fatigue management is a shared responsibility, including management, supervision, and employees. Addressing fatigue will help reduce workplace injuries, reduce errors, and provide a safe and healthy work environment.
Fatigue associated with extended hours, night shifts, and rotating shifts can have a negative impact on safety and performance. In order to prevent the negative impacts of workplace fatigue, it is important to understand the distinction between personal sources and work sources of fatigue.

Sources of personal fatigue may include:

  • Lack of sleep.
  • Poor diets.
  • Inactive lifestyles.
  • Stress.
  • Work schedule and duration.
  • Workload/stang.
  • Environmental conditions (light, temp).
  • Individual habits.
  • Health factors.
  • Family issues.
  • Personal habits.
  • Sleep disorders (insomnia, narcolepsy, snoring, sleep apnea and restless leg syndrome).
  • Age.
  • Nutrition.

Sources of personal fatigue may include:

  • Shift work.
  • Shift changes.
  • Overtime.
  • Staffing issues.
  • There may also be environmental factors such as vibration, light levels noise, and job demands.

 Icon_clock_document Some of these, such as stress and lack of sleep due to work schedules may overlap. Work sources may include shift work, shift changes, overtime, and staffing issues. There may also be environmental factors such as vibration, light levels, noise, and job demands.

Signs & Symptoms of Fatigue

  • Forgetfulness.
  • Poor Communication.
  • Impaired Decision Making Skills.
  • Lack of Alertness.
  • Slow Reaction.
  • Microsleeps.
  • Withdrawn Behavior.
  • Depressed.
  • Moody.
  • Quick to Anger.
  • No Sense of Humor.
  • Lack of Interest.
  • Always Tired.


Fatigue


It is important for food service personnel to understand how their behavior and activities contribute to the safety of food and how they can decrease the risk of foodborne illness. From processes on the farm to practices in the kitchen, everyone plays an important role in food safety.

food-safety-2    food-safety-1


Issues

  • Foodborne disease causes approximately 76 million illnesses; 325,000 hospitalizations and 5,000 deaths here in the U.S. each year.
  • The pathogens most likely to cause a foodborne illness are Norovirus, Salmonella, Clostridium perfringens, E. coli, and Campylobacter.
  • Safe food handling practices are the ones most likely to preserve food's peak quality.
  • Today’s food supply is complex and involves a range of different stages including on-farm production, slaughtering or harvesting, processing, storage, transport and distribution before the food reaches the consumers.
  • The same pathogens that cause food poisoning can cause arthritis, kidney failure, meningitis and Guillain-Barré syndrome.
  • Foods, including safely cooked and ready-to-eat foods, can become cross-contaminated with pathogens transferred from raw egg products and raw meat, poultry, and seafood products and their juices.
  • Microorganisms may be present on food products when you purchase them.

Prevention

  • Wash your hands with warm soapy water for 20 seconds before and after handling food. Also wash your hands after using the restroom, changing diapers, handling pets, etc.
  • Food should be fully cooked (above 160°) to kill potential pathogens.
  • Food must be stored below 40° or above 140° to slow the growth of bacteria.
  • Use a clean food thermometer when measuring the internal temperature of foods to make sure they have reached a safe minimum internal temperature.Rinse fresh fruits and vegetables under running tap water.
  • Never store raw food above cooked food.Use one cutting board for fresh produce, and one for raw beef, poultry, or seafood.
  • Use separate plates and utensils for cooked and raw foods.
  • You are no less important than the manufacturer, government regulator, or grocer in assuring food safety. You are an important link in the farm-to-table chain.


Portable generators can be handy when used properly but can be deadly as well, particularly from carbon monoxide fumes emitted by the gasoline engine on the generator.

Follow these tips to generate power and safety when using a generator.

portable_generator_1 NEVER operate a generator inside a building or in other enclosed or partially-enclosed spaces, including garages.
portable_generator_2 A generator is a temporary power source and should never be used as a permanent solution.
portable_generator_3 NEVER connect generators directly to household wiring without first installing a transfer switch. This prevents backfeeding which could electrocute utility workers making repairs.
portable_generator_4 Make sure the generator is properly grounded and used with a Ground Fault Circuit Interrupter (GFCI).
portable_generator_5 Do not overload the generator.
portable_generator_6 
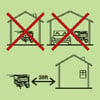
It is recommended for generators to be positioned at least 20 feet from doors, windows, and vents to prevent CO from entering the building.
portable_generator_7 Install battery-operated CO Alarms or plug-in CO alarms with battery backup inside the building.
portable_generator_8 Turn off generators and let them cool down before refueling. NEVER refuel a generator while it is hot.
portable_generator_9 Use only heavy-duty outdoor-rated extension cords that have a three-pronged plug and are rated for the inteded load.
portable_generator_10 The generator should be installed by a qualified electrician and bear the mark of a nationally recognized testing lab, such as UL, Intertek or CSA.

Golf carts, golf cars, Personal Transport Vehicles (PTV), and Gators are involved in a number of accidents each year, resulting in personal injury, death, and property damage. There are specific guidelines that should be followed for safe operation of golf carts.

Primary safety features of a golf cart include speed governors, braking systems, backup alarms and solid chassis designs. Additional features may include seat belts, mirrors, lights, etc. depending upon their use. Removing these safety controls from a cart should never be permitted. Productions that purchase older or refurbished carts should check with manufacturers to assure that the safety controls and devices are in place.

The most common causes of golf car and PTV injuries and fatalities on a national basis:

  • Overcrowding with too many passengers.
  • Standing passenger(s) in car.
  • Sharp turns (typically children being ejected from a sharp left turn).
  • Passengers ejected from rear‐facing seats.
  • Reversing downhill.
  • Leaving the brake unlocked upon exiting.
  • Driving on wet or uneven terrain.
  • Driver distraction (eating, drinking, cell phone usage).
  • Arms or legs hanging outside the car

Precautions

  • A golf cart should be operated at a speed equivalent to a well-paced walk but no faster than 15 mph. The actual speed of a golf car or PTV depends upon the terrain over which it is being driven, the weather conditions, and the total weight of the golf car, passengers and any equipment being carried.
  • Inspect the vehicle prior to use (at least daily) using the operator’s checklist. Daily inspections checklists:
    • General condition of cart body
    • Backup alarms working properly
    • Controls (forward/reverse)
    • Steering
    • Brakes work properly (including set-in-place brakes)
    • Tire condition
    • Mirrors, seatbelts, handles, etc. if applicable
  • Use readily accessible handholds and body restraints that prevent the occupants from sliding to the outside of the vehicle.
  • Only vehicles with headlights, tail lights, turn signals and windshields should be used after dark.
  • Texting should never be done while driving! Pull over and stop if cell phone use is necessary.

GotSafety has partnered with Zurich Risk Engineering to give you access to multiple bilingual lessons, helping you keep your employees up to date on their safety training. GotSafety specializes in creating customized comprehensive safety program documentation, providing safety training materials, and offering consultations from safety questions to OSHA citation consults.  You may view a general list of videos here:

Safety videos page.

Handwashing can help prevent illness. It involves five simple and effective steps (Wet, Lather, Scrub, Rinse, Dry) you can take to reduce the spread of diarrheal and respiratory illness so you can stay healthy. Regular handwashing, particularly before and after certain activities, is one of the best ways to remove germs, avoid getting sick, and prevent the spread of germs to others. It’s quick, it’s simple, and it can keep us all from getting sick. Handwashing is a win for everyone, except the germs.

Wash Your Hands Often to Stay Healthy

  • Before, during, and after preparing food
  • Before eating food
  • Before and after treating a cut or wound
  • After using the toilet
  • After blowing your nose, coughing, or sneezing
  • After touching garbage

Follow Five Steps to Wash Your Hands the Right Way

  1. Wet your hands with clean, running water (warm or cold), turn off the tap, and apply soap.
  2. Lather your hands by rubbing them together with the soap. Lather the backs of your hands, between your fingers, and under your nails.
  3. Scrub your hands for at least 20 seconds. Need a timer? Hum the “Happy Birthday” song from beginning to end twice.
  4. Rinse your hands well under clean, running water.
  5. Dry your hands using a clean towel or air dry them.


Handwashing and Hand Sanitizer Use at Home, at Play, and Out and About

Germs are everywhere! They can get onto hands and items we touch during daily activities and make you sick. Cleaning hands at key times with soap and water or hand sanitizer is one of the most important steps you can take to avoid getting sick and spreading germs to those around you.

There are important differences between washing hands with soap and water and cleaning them with hand sanitizer. For example, alcohol-based hand sanitizers don’t kill ALL types of germs, such as a stomach bug called norovirus, some parasites, and Clostridium difficile, which causes severe diarrhea. Hand sanitizers also may not remove harmful chemicals, such as pesticides and heavy metals like lead. Handwashing reduces the amounts of all types of germs, pesticides, and metals on hands. Knowing when to clean your hands and which method to use will give you the best chance of preventing sickness.

When should I use?

Soap and Water

  • Before, during, and after preparing food.
  • Before eating food.
  • Before and after caring for someone who is sick.
  • Before and after treating a cut or wound.
  • After using the bathroom, changing diapers, or cleaning up a child who has used the bathroom.
  • After blowing your nose, coughing, or sneezing.
  • After touching an animal, animal food or treats, animal cages, or animal waste.
  • After touching garbage.
  • If your hands are visibly dirty or greasy.

Alcohol-Based Hand Sanitizer

  • Before and after visiting a friend or a loved one in a hospital or nursing home, unless the person is sick with Clostridium difficile (if so, use soap and water to wash hands).
  • If soap and water are not available, use an alcohol-based hand sanitizer that contains at least 60% alcohol, and wash with soap and water as soon as you can.

* Do NOT use hand sanitizer if your hands are visibly dirty or greasy: for example, after gardening, playing outdoors, or after fishing or camping (unless a handwashing station is not available). Wash your hands with soap and water instead.


hand_hygiene

Workers may be required to work in hot environments for long periods. When the human body is unable to maintain a normal temperature (98.6 F), heat illnesses can occur and may result in death. It is also important to remember that hot work environments that may contribute to heat illness also exist indoors. The most serious heat illness is heat stroke, which can be fatal requiring that the symptoms be recognized. Precautions also need to be taken to prevent other heat illnesses; heat exhaustion, heat cramps, heat rash, and even sunburn.

Risk Factors

  • High temperature and humidity, direct sun exposure, no breeze or wind.
  • Heavy physical labor.
  • No recent exposure to hot workplaces.
  • Low liquid intake.
  • Waterproof clothing or use of personal protective equipment.

Heat Stroke

Heat Stroke is the most serious heat-related health problem and a life-threatening emergency. Heat stroke occurs when the body’s temperature regulating system fails and body temperature rises to critical levels (greater than 104°F). This is a medical emergency that may result in death.

Symptoms

  • Confusion.
  • Altered behavior.
  • Loss of consciousness.
  • Seizures/convulsions.
  • Very high body temperature (greater than 104°F).
  • Lack of sweating.

Call 911

Get medical help immediately-- Call 911! Until medical help arrives:

  • Move the worker to a shady, cool area.
  • Remove as much clothing as possible.
  • Wet the worker with cool water and circulate the air with a fan to speed cooling.
  • Soak the worker's clothing with cold water.
  • Place cold wet clothes, wet towels or ice all over the body.

Heat Exhaustion

Heat Exhaustion is the next most serious heat-related health problem. Heat exhaustion is a condition whose symptoms may include heavy sweating and a rapid pulse, a result of your body overheating.

Symptoms

  • Headache.
  • Nausea.
  • Dizziness.
  • Weakness.
  • Irritability.
  • Confusion.
  • Thirst.
  • Heavy Sweating.
  • Body temperature greater than 100°F.

First Aid

  • Remove workers with heat exhaustion from the hot area.
  • Give liquids to drink.
  • Cool the worker with cold compresses to the head, neck, and face.
  • Encourage frequent sips of cool water.
  • Take workers with signs of heat exhaustion to a clinic or emergency room for medical evaluation and treatment.
  • If symptoms worsen, call 911 and get medical help immediately.

Heat Cramps

Heat cramps are intermittent, involuntary spasms of larger muscles that occur in an individual who is physically active in hot weather. Muscle pains are usually caused by the loss of body salts and fluid during sweating. Heat cramps are the least serious of the three heat-related illnesses, but still may be very painful and alarming.

Symptoms

  • Painful, brief muscle cramps, causing muscles to spasm or jerk involuntarily.
  • Muscles most often affected:
    • Calves.
    • Arms.
    • Abdominal wall.
    • Back.
  • Heat cramps may involve any fatigued muscle group.

First Aid

  • Rest briefly and cool down.
  • Drink clear juice or an electrolyte-containing sports drink.
  • Practice gentle, range-of-motion stretching and gentle massage of the affected muscle group.
  • Don't allow the worker to resume strenuous activity for several hours or longer after heat cramps go away.
  • If symptoms worsen, get medical help immediately.

Heat Rash

Heat Rash is the most common problem in hot work environments. Heat rash is caused by sweating and looks like a red cluster of pimples or small blisters.

Symptoms

  • Red cluster of pimples or small blisters.
  • Heat rash may appear on:
    • Neck.
    • Upper chest.
    • Groin.
    • Under the breasts.
    • Elbow creases.
  • Heat cramps may involve any fatigued muscle group.

First Aid

  • Rest briefly and cool down.
  • Keep the rash area dry.
  • Powder may be applied to increase comfort.
  • Ointments and creams should not be used on a heat rash.
  • Anything that makes the skin warm or moist may make the rash worse.
  • If symptoms worsen, get medical help immediately.

To Prevent Heat Illness:

  • Provide training about the hazards leading to heat stress and how to prevent them.
  • Don’t wait until thirsty to drink water - at least one quart of water per hour is needed.
  • Modify work schedules and arrange frequent rest periods with water breaks in shaded or air-conditioned areas.
  • Gradually increase workloads and allow more frequent breaks for workers new to the heat or those that have been away from work to adapt to working in the heat (acclimatization).
  • Designate a responsible person to monitor conditions and protect workers who are at risk of heat stress.
  • Wear light-colored, loose fitting, long-sleeved shirt and pants, and UV sunglasses, as appropriate.
  • Eat light meals as hot, heavy meals add heat to the body.

According to the Consumer Product Safety Commission, ladder related incidents cause over 90,000 individual emergency room visits each year. Of those 90,000 incidents, 32% resulted in fractures.

All Ladders are not created equal – the use of improper ladders can result in reaching, slipping or falling. To prevent injuries, there are risk factors that should be understood when selecting and using ladders.

Selection

Electrical vs. non-electrical work performed

use non-conductive ladders when performing electrical work.

Ground composition and slope

Use leg extensions to bring the ladder level, if necessary.

Height of work

Extend ladders high enough to safely perform work

Correct duty ratings based on an individual’s weight.
  • Type I up to 250 pounds.
  • Type II up to 225 pounds.
  • Type III up to 200 pounds.
Other considerations include:
  • Weight of the ladder.
  • Rung tread traction.
  • Ladder stability
  • Intended use

Precautions

Warnings

Always comply with manufacturer safety warnings.

Wear

Check for loose or bent rungs.

Tear

Cracks in the frame.

Broken Parts

A frame ladder locks are in tract.

Cleanliness

Check for ladder or grease on rungs.

Repair

Replace any broken parts with manufacturer parts only.

Removal

If cracks are visual in the frame or parts not available take out of service and destroy.

Use and Storage

Ascending and descending Ladder

Face the Ladder and use both hands.

Ladder positioning

Minimize over- reaching.

Fall protection

Always wear safety harness when working at levels greater than six feet.

Proper footwear

Wear shoes with nonskid soles.

Fall prevention

Never stand on the top two rungs.

Storage

Secure Ladder by chain or equivalent when not in use.

Intermittent use

Lay down the ladder or secure it so it cannot fall on someone or something.


Additional Resources

NIOSH Ladder Safety – smartphone app to access ladder safety
Zurich Risk Topic – Ladder Safety
The American Ladder Institute (ALI)
littlegiantladders.com

Avoid Potential Contact with Power Lines!

This Safety Bulletin includes, but is not limited to, the placement of equipment such as ladders, scaffold, booms, forklifts, aerial lifts, sets, cranes or other rigging.

Table 1 - California

General Clearances Required from Energized Overhead High-Voltage Conductors.

The operation, erection, handling or transportation of tools, machinery, materials, structures, scaffolds, or any other activity where any parts of the above or any part of an employee’s body will come closer than the minimum clearances from energized overhead lines as set forth in Table 1 shall be prohibited.

Nominal Voltage (Phase to Phase) Minimum Required Clearance (Feet)
600.................................50,000 6
over 50,000.......................345,000 10
over 345,000......................750,000 16
over 750,000....................1,000,000 20


Table 2 - California

Boom-type Lifting or Hoisting Equipment Clearances Required from Energized Overhead High-Voltage Lines.

Boom-type lifting or hoisting equipment: The erection, operation, or dismantling of any boom-type lifting or hoisting equipment, or any part thereof, closer than the minimum clearances from energized overhead high-voltage lines set forth in Table 2 shall be prohibited.

Nominal Voltage (Phase to Phase) Minimum Required Clearance (Feet)
600................................50,000 10
over 50,000........................75,000 11
over 75,000.......................125,000 13
over 125,000......................175,000 15
over 175,000......................250,000 17
over 250,000......................370,000 21
over 370,000......................550,000 27
over 550,000....................1,000,000 42

When working outside of California in the United States, follow the Code of Federal Regulations, Title 29, Part 1910, Section 333, and follow Table 3 below, unless the state in which you are working has separate standards, which can be accessed on the state’s OSHA website. Production should always consult the proper authority (federal and/or state) to ensure compliance with applicable laws and regulations for the jurisdiction in which they are working.


Table 3 - Federal

Federal Clearances Required When Working On or Near Exposed Energized Parts.

When an unqualified person is working in an elevated position near overhead lines, the location shall be such that the person and the longest conductive object he or she may contact cannot come closer to any unguarded, energized overhead line than the following distances:

Nominal Voltage (Phase to Phase) Minimum Required Clearance (Feet)
50,000 or below 10
over 50,000 10 feet plus 4 inches for every 10,000 volts over 50,000 volts

Production companies may choose to set greater clearance requirements than listed above. If there are questions or concerns, consult with your studio or job site safety representative for more information.

Pyrotechnics Best Practicesfire

Hazards

  • Blast effects - projectiles and debris.
  • Radiated heat/flash - Fire Spread.
  • High noise levels.
  • Toxic chemical release.
  • Premature discharge.


To Do

  • Hold a safety meeting prior to pyrotechnic activity. Notify all departments and include notification in the daily call sheet for any rehearsals in which pyrotechnics are used.
  • Conduct a technical rehearsal before a pyrotechnic sequence is first performed.
  • Identify any secure all required personal protective equipment (PPE).
  • Clothes, props & other production items in the vicinity of the pyrotechnics should have flame retardant properties.
  • Establish and communicate emergency procedures to affected workers.
  • Assess escape routes for appropriate marking and free of obstructions.
  • Assure fire protection systems are operational and that trained personnel are onsite.
  • Confirm sufficient number and types of fire extinguishers are accessible in and around the pyrotechnic discharge area.
  • Post-performance inspections on the pyrotechnic equipment to ensure that all devices have been discharged.
  • Ensure that all used pyrotechnic materials are appropriately disposed of according to SDS and/or manufacturers guidelines.


Transportation and Material Handling

  • Notify the Transportation Coordinators if any pyrotechnics are being transported so that they can properly account for high hazard material.
  • Drivers of vehicles should be trained and licensed to transport pyrotechnic material.
  • Store pyrotechnics per labeled instructions but typically in a dry, vented area, maintaining a 3 foot clearance from any electrical equipment or any other potential ignition sources.
  • Post “No Smoking” and “Explosion” signage where pyrotechnics are stored and handled.


Firing Controls

  • Any device capable of transmitting radio signals - including mobile phones - should be powered off while the pyrotechnics are being prepared.
  • Power sources used for pyrotechnic discharge should be designated specifically for the pyrotechnic firing and not used for other applications.

All managers and crew shall strive for the highest safety standards and work diligently to maintain a safe and healthy work environment. Communication of information is one of the most effective measures to ensure a safe set.

Safety takes precedence over expediency

The Company Shall:

  1. Identify person(s) with authority and responsibility for implementing and maintaining a safety program.
  2. Include a system for ensuring that cast and crew comply with safe and healthy work practices.
  3. Maintain a system for communicating with cast and crew in a form readily understandable by all affected employees on matters relating to occupational safety and health. A safety hotline or other means shall be established to encourage anonymous reporting of hazards without fear of reprisal.
  4. Establish procedures for identifying and evaluating hazards at all work sites, stages, and locations including scheduled periodic inspections to identify unsafe conditions and work practices. Inspections shall be conducted and documented.
  5. Establish a mechanism and/or procedure for correcting unsafe or unhealthy conditions, work practices, and work procedures in a timely manner based on the severity of the hazard.
  6. Establish a procedure to investigate occupational injuries or illnesses.
  7. Provide training and instruction to all cast and crews as required by the Occupational Safety and Health Administration (OSHA).

Safety Meetings

In “live event planning” situations, safety meetings are strongly recommended to make all involved aware of the apparent and potential hazards in the day’s work. For example, safety meetings should be held: (1) when production and or live events moves to a new location; (2) when there is a significant change in live stage set-ups; (3) when fatigue may be of concern; or (4) when there are significant changes to the original plan for the day. Safety meetings should be conducted by the event manager and should be attended by all affected crewmembers.

In event stage set-up situations, the Construction Coordinator and/or Department Head should conduct safety meetings (toolbox talks, tailgate meetings, etc.) to address pertinent safety issues, use of specialized equipment, or unusual construction activities and/or rigging. The Construction Department is required to have a Safety Meeting at least once every ten (10) days, or when new equipment is introduced and/or when special situations require additional meetings.


The following procedures are recommended:

  • Schedule safety meetings at the earliest time in which the majority of team members can be assembled.
  • Convey pertinent information to all personnel unable to attend.
  • All safety meetings should be documented.
  • Identify potential hazards. Department Heads should discuss hazards and establish safe working zones.
  • Discuss emergency procedures, including identifying the location of fire alarms, fire extinguishers, emergency exits, first aid kits and telephones for 911 emergency calls. Additionally, explain studio/location safety program protocol, and identify medical or special emergency personnel (e.g., paramedics, police, and fire personnel).
  • Present an evacuation plan in the event of an emergency. Remind all departments to keep fire lanes, electrical panels and exits clear at all times.
  • Advise the cast and/or crew to notify the First Assistant Director/Stage Manager, Construction Coordinator and/or Department Head of any safety concerns or hazards.
  • Inform cast and/or crew that, in the event of an injury, the set medic and the First Assistant Director/Stage Manager, Event Management, Construction Coordinator and/or Department Head must be notified immediately. The First Assistant Director/Event Manager, Construction Coordinator and/or Department Head will assess the situation and notify appropriate personnel, such as the UPM, Director, Producer, Event Manager or Safety Representative, if applicable.

When creating smoke or fog effects, qualified technicians will be used that utilize the minimum concentration necessary to achieve the desired effect.

Precautions

The following substances should not be used:

  • Known human carcinogens including any particulates of combustion, including tobacco smoke (except where such smoke results from the smoking of tobacco by an actor in a scene).
  • Fumed and hydrolyzed chlorides.
  • Ethylene glycol and Diethylene glycol.
  • Mineral oils.
  • Aliphatic and aromatic hydrocarbons including petroleum distillates.
  • Hexachloroethane and Cyclohexylamine.

The following substances may be used:

  • Propylene glycol, Butylene glycol, Polyethylene glycol and Triethylene glycol. Other glycol products should not be used.
  • Glycerin products (Caution: Glycerin and the listed glycol products should not be heated beyond the minimum temperature necessary to aerosolize the fluid. In no event should glycerin or glycol be heated above 700°F).
  • Cryogenic gases may be used but not in confined spaces or low lying areas. Adequate fresh air should be supplied to avoid depleting oxygen levels. Use care also to avoid adverse effects of cooled air on exposed persons.

** Safety Data Sheets (SDS) should be consulted and available on the worksite.
 

Other Precautions:

  • When smoke or fog effects are created on stage, the stage shall be periodically ventilated or exhausted, vertically and laterally, or all personnel shall be given a break away from the stage at appropriate intervals. All non-essential personnel shall be excluded from the stage.
  • When creating smoke or fog effects on an exterior location, Leads shall exercise all reasonable precautions to prevent smoke and fog inhalation. Leads shall make respirators of the appropriate type available if exposure limits are expected to be exceeded. If respirators are used, the person providing respirators shall be designated and all respirator protocol should be employed - including employee fit testing and training on use, maintenance, inspection and storage

According to the National Ski Areas Association (NSAA), 54.8 million skier/snowboarders visited the mountains during the 2016/17 season, resulting in 44 fatalities (33 skiers and 11 snowboarders) of which 82% were male. There were 33 catastrophic injuries as a result of a broken neck or back, leading to paralysis and severe head trauma. 68% of catastrophic injuries and fatalities were the result of collisions with trees, skiers or other objects.

Following some fundamental guidelines and learning more about the risks associated with these winter sports will create greater awareness and improve the frequency and severity of common skiing and snowboarding injuries.

Pre Ride Preparations

Pre-conditioning is intended to prepare an individual for the strenuous requirements of high elevations and fatiguing conditions: physical demands and lack of oxygen.

8-10 hours of rest to minimize fatigue and maximize alertness.

Daily stretching to condition areas of potential injury and during a fall.

Plan to stay hydrated and take frequent breaks during strenuous activities

Understand your skill level and ski accordingly

Equipment

The boot/binding interface is the most common cause of equipment-related injury due the rigid couplings increased force on the leg and knee.

What to check:

  • Tighten/check cross threads on all bolts.
  • Annual binding release testing certification.
  • Use proper boot wear for binding release.
  • Don’t use boards/skis with cracks.
  • Assure proper helmet fit and condition.


What to wear:

  • Wear moisture wick wool socks & thermals.
  • Wear fleece jackets, shell/pants outerwear.
  • Wear waterproof gloves.
  • Anti-fog sunglasses/goggles.
  • SPF 30+ sunblock.


Avoid Collisions – Responsibility Code Basics

  • Maintain a safety bubble – don’t ride to close.
  • Minimize excessive speeding and ride in a Z pattern.
  • Don’t stop suddenly if at all possible.
  • Maintain awareness of other skiers and unsafe terrain.
  • Keep your head on a swivel – avoid distractions.
  • Only travel down Beginner trails (green) when heading back to a basecamp.


Additional Resources

Ski/snowboard injury Statistics
Tree Well Accident Prevention
Lift Safety

Do you have a fear of working around water or cannot swim?

All personnel scheduled for water work shall be notified in advance via the Call Sheet. Personnel who are uncomfortable working in or around water should notify their supervisor prior to that day’s call.


All preformers and crewmembers working on or near water should wear life vests or other water safety gear when appropriate.

When necessary, implement a plan to account for personnel in the water, such as a “buddy” or a check in/check out system.


Know as much as you can about the body of water you’re working on or in, including its natural hazards and animal life. The Director of Operations and Safety Coordinator should have all relevant information.

When working in contact with water, the Director of Operations should identify and make known prior to actual activities, all available knowledge regarding currents and natural/man-made hazards, including sub-surface objects, underwater life and contamination. Upstream activities, such as dams, waste disposal sites, agriculture, chemical plant dumping sites, flash flood dangers should also be evaluated. If a potential safety hazard is found to exist, the Producer should take appropriate steps to mitigate the hazard.

Extreme care should be taken regarding dangerous marine life, including reptiles.


Electrical Safety

Special care must be used when electricity is used in or around water. All electrical cables and lights near water shall be properly secured to prevent tipping and falling. All wiring, electrical equipment and devices that may be submerged under water should be approved for underwater use, be watertight, have no exposed live connections and be constructed such that there is no shock hazard. Follow applicable provisions of the National Electric Code and/or local regulations.

When lighting, electrical distribution, or any electrically powered equipment is used near water or can make contact with water, the use of GFCI (ground-fault circuit interrupter) should be evaluated by a qualified person. This includes all areas where water hazards exist. When persons, wardrobe, props, or equipment are wet, the need for GFCI protection should be evaluated. GFCIs should not be used on circuits where removal of power may create a greater hazard, such as airbags, decelerators, emergency egress lighting, etc.


If personnel are going to enter the water, it may be necessary to sample and analyze the water for any potential environmental concerns and/or health hazards.

Prior to personnel entering a body of water, the water should be determined to meet the applicable regulatory standards for “recreational full body contact”. This determination may be made by: direct water sampling, confirmation by local health authorities and/or detailed other knowledge of the uses and water sources supplying the body of water. Water sampling results and acceptable water quality criteria shall be made available upon request. When it is determined that a body of water is contaminated or hazardous, the contamination or hazard should be neutralized or the site shall be avoided.

The Director of Operations should take steps to prevent hyperthermia (elevated body temperature) and hypothermia (reduced body temperature). Provisions for post-immersion washing should be available.


Safety lines, nets, watch safety personnel and/or divers should be used when working in rivers or other bodies of water where potentially hazardous conditions could exist ( ex. swift currents, thick underwater plant life, rocks).

When working in fast-moving rivers, downstream safety pickup personnel and safety equipment should be stationed for downstream emergency rescue.


Pre-Planning

Pre-planning can reduce many of the potential dangers posed by inclement weather. The location manager, his/her department representative or production management, should develop an "action plan" when preparing to use locations that may present an inclement or severe weather hazard.

Flash Flooding

Causes

  • Flash flooding is usually caused by slow moving thunderstorms and can occur within a few minutes or hours of excessive rainfall. High risk locations include low water crossings, recent burn areas in mountains and urban areas which have pavement and roofs which concentrate rainfall runoff.
  • Flash flooding may be worsened by topography, soil conditions and ground cover. Be especially cautious at night when it is harder to recognize flood dangers.
  • Realize it does not have to be raining at your specific location for a flood to occur.

Potential Hazards

  • Crew and equipment could become trapped or stranded as escape routes may be damaged and/or blocked.
  • Equipment and personnel could be swept away or covered by water, mud or debris.
  • Drowning.
  • Electrocution.
  • Mud slides.

Possible Actions

  • Activate the action plan.
  • Secure equipment and all electrical power.
  • Remove all cast and crew from elevated equipment, scaffolds, booms and sets.
  • Stay clear of potential slide areas next to hillsides or on edges of cliff areas.
  • Follow directions for evacuation procedures as outlined in the action plan.
  • Gather at pre-determined evacuation point and ensure everyone is accounted for.
  • If you come upon a flowing stream where water is above ankles, STOP! Turn around and go another way.
  • Do not drive through moving water or a flooded roadway.
  • Do not attempt to return to the area until an "all clear" signal has been given by a regulatory authority or production management.

Lightning

Causes

Lightning results from the buildup and discharge of electrical energy in clouds. Lightning may strike several miles from an associated thunderstorm and may strike when no clouds or rain are present.

Potential Hazards

  • Electrocution.
  • Burns.
  • Falling debris.
  • Concussion.
  • Fire.

Possible Actions

  • Activate the action plan.
  • Secure equipment and all electrical power.
  • Remove all cast and crew from elevated equipment, scaffolds, booms and sets.
  • When instructed, seek refuge from potential lightning strikes indoors.
  • Follow directions for evacuation procedures as outlined in the action plan.
  • Gather at pre-determined evacuation point and ensure everyone is accounted for.
  • If you come upon a flowing stream where water is above ankles, STOP! Turn around and go another way.
  • Do not drive through moving water or a flooded roadway.
  • Do not attempt to return to the area until an "all clear" signal has been given by a regulatory authority or production management.

High Winds

Causes

High winds can be associated with extreme weather phenomenon including thunderstorms, tornados, hurricanes, and high and low pressure systems. During the summer months in the Western States, thunderstorms often produce little rain but very strong wind gusts (some up to 100 mph) and dust storms.

Potential Hazards

  • Flying debris.
  • Dust.
  • Set Destruction.
  • Eye injuries.
  • Possibility of persons being swept off their feet.
  • Equipment can be blown over and carried for a distance.

Possible Actions

  • Activate the action plan.
  • Remove all cast and crew from elevated areas, sets, scaffolding and other high objects.
  • Lower all aerial, lighting, diffusion, camera boom equipment and tents.
  • Tie down and secure all loose equipment.
  • When instructed, seek refuge from the winds at your pre-determined safe area.
  • Be aware and protect your eyes from potential injury.
  • Do not attempt to return to the area until an "all clear" signal has been given by a regulatory authority or production management.

Blizzard or Severe Snow Storms

Causes

Hail is usually associated with thunderstorms and is caused by freezing rain that can become very large.

Blizzards and Snow Storms occur during winter months across much of the US.

Avalanches (snow) can be triggered on snowy mountainous terrain; usually by victim(s) or members of victims' party. Generally occurs with clear skies, after a snow fall, with light or calm winds, and on 30-40 degree slopes, the often occur at a convex part of the slope. Avalanches are triggered when a layer of snow, often surface hoar, becomes too weak to support the weight of the snow above it.

Potential Hazards

  • Hail may cause injuries to crew and damage to equipment.
  • Snow fall and blizzards can cause blinding or white-out conditions.
  • Creation of snow drifts.
  • Dangerous wind chill factor (see Cold Stress Safety).
  • Possibility of persons being swept off their feet.
  • Avalanche danger, being caught and/or buried.

Possible Actions

  • If a watch or warning has been issued, the action plan should be activated and the crew should follow all instructions.
  • Secure and protect all equipment.
  • Get down from elevated areas, aerial lifts, booms, scaffold and other high areas.
  • Stay clear from potential avalanche areas.
  • When instructed, seek shelter at your pre-determined safe area.
  • Do not attempt to return to the area until an "all clear" signal has been given by a regulatory authority or production management.

Tornadoes

Causes

  • A tornado is a violent windstorm characterized by twisting, funnel-shaped wind. Tornadoes tend to occur in the afternoon and evening hours.
  • They are created when two opposing windshear factors collide, creating a circulation of rapidly spinning winds.
  • They frequently occur with thunderstorms, but can occur without them, such as in the case of dust storms.

Potential Hazards

  • Tornadoes are unpredictable and may form without warning.
  • Winds can exceed 200 to 300 mph.
  • Tornadoes may appear nearly transparent until dust and debris are picked up or a cloud forms within the funnel.
  • Severe damage can occur to structures.
  • The precise location of a touchdown point cannot be determined.

Possible Actions

  • If a watch or warning has been issued, the action plan should be activated.
  • The crew should be regularly updated regarding any changes to potential weather conditions.
  • Remove all cast and crew from elevated equipment, scaffolds, booms and sets.
  • Evacuate area immediately if instructed by a regulatory authority or production management.
  • Only secure equipment if there is time and it can be done safely.
  • Follow directions for evacuation procedures or shelter procedures as outlined in the action plan.
  • Do not attempt to return to the area until an "all clear" signal has been given by a regulatory authority or production management.

Hurricanes

Causes

Hurricanes are slow developing tropical weather phenomenon that form over water. They are also known as cyclones or typhoons. The combination of rainfall, storm surge, and high winds create a high potential for damage as they come on shore. Because they are slow developing, weather forecasts provide warning before they arrive.

Potential Hazards

  • Severe winds and rainfall, which may cause extreme flooding.
  • Storm surges.
  • Localized tornadoes.
  • Severe injury due to flying debris.
  • High waves.
  • Drowning.
  • Extreme damage to structures, roads, utilities, vehicles and boats.

Possible Actions

  • Activate the action plan. In most cases, you will have several days warning to prepare and activate the plan.
  • Pack and secure equipment and all electrical power, including removing equipment to a safe area.
  • Do not stay by the shoreline.
  • Lower all aerial lifts, camera booms and other equipment. Remove to a safe area as time permits.
  • If ordered to evacuate, leave area early - do not hesitate.
  • Do not attempt to return to the area until an "all clear" signal has been given by a regulatory authority or production management.

Zurich Production Solutions helps our clients identify, remedy, and prevent workplace safety and compliance problems across their entire enterprise.  The combination of ZPS software, consulting, and training helps companies minimize overall risk so they can focus on what’s important – their core business.

If you would like to arrange for a Zurich Production Services Consultation or speak with a GotSafety professional, please contact:

workcomp@castandcrew.com

Put some clear and concise content in here. Keep your reader in mind. What are they trying to do? What are they hoping to learn? Why are they reading this? Help them out and use the tone and voice of your organization.

We're Here to Help

For your Risk Management Team needs, please reach out to losscontrol@castandcrew.com or 818-738-9351.